Mechanical Cabinetry Tuning: Maintaining Alignment with the Cabinet Door Adjust
September 5, 2026
No Comments
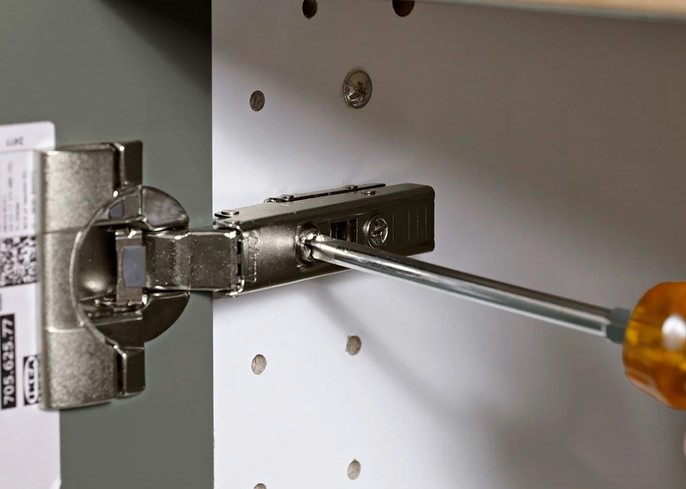
Source:https://www.familyhandyman.com
Nothing breaks the visual flow of a high-end kitchen faster than a sagging, crooked cabinet door. You walk into your kitchen, grab a cup of coffee, and suddenly all you can see is that annoying 1/4-inch offset gap on your main upper cabinet.
In my over ten years of getting my hands dirty in residential home improvement, I’ve seen homeowners try everything from jamming folded cardboard under hinges to replacing entire face frames out of pure frustration. The good news? You don’t need a complete kitchen remodel, and you certainly don’t need to spend hundreds of dollars on a carpenter.
All you need is a simple screwdriver, fifteen minutes, and a systematic approach to perform a precise cabinet door adjust. Think of your cabinet hinges like the steering and suspension on a high-performance sports car; even the finest mechanics drift out of alignment over time, but a quick tune-up brings everything back to factory specs.
The Anatomy of Modern Concealed Hinges (European Hinges)
Before grabbing your toolkit, let’s talk about the hardware holding your doors in place. About 90% of modern kitchens use concealed European hinges (often referred to as 3-way adjustable hinges).
If you open your cabinet door right now, you’ll see a metal mechanism sitting inside a circular cup mortised into the back of the door. These mechanical marvels are designed around three distinct axes:
-
Vertical Axis (Y-Axis): Moves the door up and down.
-
Horizontal Axis (X-Axis): Shifts the door left or right (adjusting the gap between doors).
-
Depth Axis (Z-Axis): Moves the door closer to or farther away from the cabinet frame.
       [ Y-Axis: Up / Down ]
                ▲
                │
 [ X-Axis: Left / Right ] ◀───┼───► [ Z-Axis: In / Out ]
                │
                ▼
Understanding how these three directions interact is the secret sauce to a flawless alignment. When one screw shifts, it exerts mechanical leverage across the entire plane of the door.
Step-by-Step Guide: Executing a Precise Cabinet Door Adjust
Let’s walk through the exact process I use when walking onto a job site with misaligned cabinetry.
1. The Pre-Flight Inspection
Close all cabinet doors and step back about 6 feet. Identify which doors are out of alignment. Is the gap between double doors uneven? Is the top edge scraping against the face frame?
Pro Tip: Always remove your cabinet bumpers (those little clear silicone pads) before making micro-adjustments. They can distort your visual baseline and throw off your depth calculations.
2. Fixing the “Sagging Door” (Vertical Adjustment)
If your door is hanging too low or sitting higher than its adjacent neighbor, you need a vertical cabinet door adjust.
-
Locate the mounting plate attached to the cabinet box.
-
Loosen the top and bottom mounting screws slightly (do not remove them entirely).
-
Manually slide the door up or down to align the top edge with adjacent doors.
-
Tighten the screws firmly while supporting the weight of the door.
3. Eliminating the Gap (Horizontal Side-to-Side Adjustment)
When double doors don’t meet evenly in the middle, or one door overlaps the edge of the cabinet box, the horizontal screw is your target.
-
Look at the arm of the hinge attached to the cabinet box. The screw closest to the door face controls side-to-side movement.
-
Turn clockwise: Moves the door closer to the hinge side (widening the gap between double doors).
-
Turn counter-clockwise: Pushes the door away from the hinge side (closing the gap in the middle).
-
Make tiny adjustments—turn the screw just a quarter-turn at a time, close the door, and check the alignment.
4. Correcting Warped Pull (Depth Adjustment)
If the top corner of your door sticks out while the bottom touches the frame, your depth needs calibration.
-
Find the screw furthest back on the hinge arm (or the cam mechanism in higher-end hardware like Blum or Salice).
-
Loosen the screw slightly and push or pull the door face toward or away from the cabinet box.
-
Re-tighten and check if the door sits flush against the frame pads when fully closed.
Mechanical Diagnosis Matrix
Use this quick troubleshooting table to quickly identify which screw requires your attention:
| Visual Symptom | Root Cause | Primary Hinge Screw Target | Corrective Action |
| Door scrapes top/bottom frame | Vertical drift | Mounting plate tracking screws | Loosen, shift up/down, re-tighten |
| Uneven gap between double doors | Horizontal offset | Front arm screw (X-axis) | Turn clockwise to widen gap; counter-clockwise to narrow |
| Door springs open or doesn’t flush | Depth misalignment | Rear arm screw (Z-axis) | Adjust in/out until door seats flush on silicone pads |
| Door feels loose or wobbly | Stripped mounting hole | Base plate screws | Repair wood hole with hardwood dowel & glue |
Hidden Pitfalls to Avoid During Cabinet Calibration
Over my ten years in the field, I’ve seen enthusiastic DIYers make a few critical errors that turn a 10-minute job into an afternoon of frustration.
The Screwdriver Trap
Never, under any circumstances, use an impact driver or high-torque power drill to perform a cabinet door adjust. European hinge screws are set into soft wood, MDF, or particleboard. High torque will strip the threads instantly, leaving you with a hole that no longer holds a screw. Stick to a manual #2 Phillips or Pozidriv hand screwdriver.
Ignoring Cabinet Box Levelness
If you’re trying to adjust cabinet doors on a base cabinet that isn’t level, you’ll end up chasing your tail. If the box itself is twisted or racked on an uneven floor, the doors will never sit flush. Always verify that your cabinet box is plumb and level before assuming the hinges are at fault.
Long-Term Maintenance: Keeping Everything Centered
Once you’ve achieved those clean, uniform 1/8-inch reveals across your entire kitchen, a small amount of preventative care goes a long way.
-
Check screw tightness annually: The repeated mechanical stress of opening and closing doors naturally vibrates screws loose over time.
-
Clean hardware periodically: Dust, grease, and cooking oils collect on exposed hinge arms. Wipe them down with a soft microfiber cloth and a mild degreaser.
-
Avoid overloading doors: Heavy door-mounted spice racks or organizer bins add uneven weight distribution, accelerating hinge sag on the upper mount.
Tuning your cabinetry is one of the most cost-effective home improvement projects you can undertake. It costs zero dollars, requires minimal tools, and delivers an immediate visual upgrade to your living space.
Have you tried tweaking your own cabinet hinges recently? What’s the trickiest alignment issue you’ve encountered in your home? Drop a comment below or share your questions—I’d love to help you troubleshoot your setup!