Architectural Climate Management: Enhancing Exterior Comfort with the Sun Shade Sail
Source:https://images.adsttc.com
It is a gorgeous, clear Saturday afternoon in the middle of July. You’ve fired up the grill, set the outdoor dining table, and invited your closest friends over for a patio barbecue. But by 2:00 PM, the celebration halts. The brutal, blinding midday sun beats down so relentlessly that your concrete patio feels like an oven floor, your drinks are warm within minutes, and your guests are actively retreating indoors to the air conditioning.
Over my ten-plus years of designing outdoor living spaces and managing backyard renovations, I have seen this exact scenario unfold on beautiful properties everywhere. Homeowners build magnificent, expensive wooden decks and stone patios, only to realize they can only comfortably use them for a few hours a week because of uncontrollable solar heat gain.
Early in my career, the standard fix was building a heavy, permanent wooden pergola or setting up a fragile, unstable patio umbrella. But everything changed for me when I began integrating commercial-grade sun shade sail systems into my projects. These tensioned fabric structures aren’t just aesthetic design pieces; they are highly engineered microclimate controllers that manipulate airflow and thermal radiation to completely transform your exterior comfort.
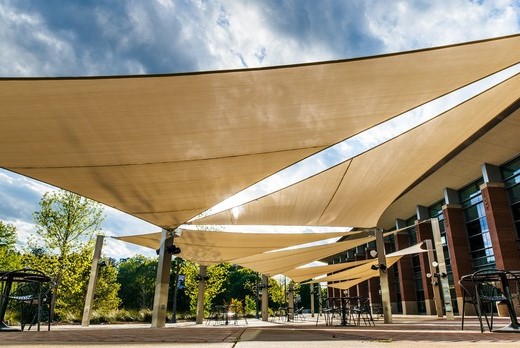
The Physics of Outdoor Cooling: Beyond Simple Shade
Many beginners assume that cooling an outdoor space is exactly like putting a giant hat over your deck. But architectural climate management is far more complex than just blocking visible light; it requires managing ambient temperature and UV radiation.
When direct sunlight hits a hard surface like concrete, brick, or timber decking, those materials absorb the thermal energy and radiate it back upward. This is known as the urban heat island effect on a micro-scale.
A professionally installed sun shade sail acts like an active atmospheric filter. Instead of trapping hot air beneath it like a solid vinyl awning or a heavy wooden roof would, a premium shade sail uses a specialized porous knit pattern. This allows rising hot air to escape freely through the fabric mesh while blocking up to 95% of harmful ultraviolet rays, creating a continuous cooling breeze beneath the canopy.
Fabric Science: Decoding Material Specifications
When you start shopping for a sun shade sail, you will quickly discover that prices range from twenty dollars online to hundreds of dollars at a commercial supply house. Let’s look at the technical differences so you don’t buy a glorified plastic tarp that tears during its first thunderstorm.
HDPE vs. Polyester: The Ultimate Material Showdown
The chemical composition of your sail fabric dictates how long it will survive under constant exposure to solar radiation:
-
High-Density Polyethylene (HDPE): This is the industry standard for high-durability performance. HDPE is a heavy-duty, lock-stitched knitted fabric that allows the material to breathe. It is highly resistant to rot, mold, and moisture, and it will not degrade or become brittle under intense UV exposure.
-
Woven Polyester (Canvas): These sails are often coated with a polyurethane layer to make them completely waterproof. While great for keeping rain off your patio furniture, they trap heat underneath like a greenhouse and suffer from immense wind-load strain because air cannot pass through the weave.
Weight Matters: Checking the GSM Rating
When analyzing a product’s data sheet, always look for the GSM (Grams per Square Meter) specification. This measures the density and thickness of the fabric:
-
150–185 GSM: Light-duty, residential grade. Suitable for temporary seasonal use, but prone to stretching out of shape over time.
-
280–340+ GSM: Commercial grade. This is what I specify for all my client builds. It features massive tensile strength, resists sagging under heavy tension, and easily withstands high wind gusts.
The Geometry of Tension: Why Flat Sails Fail
Let’s use a simple engineering analogy. Imagine trying to hold a heavy bedsheet completely flat and still between your hands while a powerful wind turbine blows directly into it. The sheet will whip, flap, and instantly rip out of your grip.
A common rookie mistake I see when installing a sun shade sail is mounting all the corner anchor points at the exact same height, creating a completely flat horizontal plane. When wind hits a flat sail, it turns the fabric into a giant sail wing, generating thousands of pounds of lifting force that can easily rip your metal brackets clean out of your home’s wood framing.
To prevent this, professionals design structures using hyperbolic paraboloid geometry—often called a “twist” or a saddle shape.
  High Point (Corner A)               Low Point (Corner B)
          \                                   /
           \_________________________________/
           /                                 \
          /                                   \
  Low Point (Corner C)                High Point (Corner D)
By mounting two opposing corners high and the other two opposing corners low, you create a dynamic three-dimensional curve. This structural twist channels the wind smoothly over and under the fabric, dramatically reducing wind load while ensuring that rainwater sheds off the sides immediately instead of pooling into a heavy puddle in the center of your sail.
Step-by-Step Installation Protocol for Maximum Durability
Installing a tensioned fabric structure requires serious structural planning. Here is the exact installation sequence I use to ensure a sail remains stable for years.
1. Identify Your Structural Anchor Points
Never mount a heavy-duty shade sail anchor directly into thin fascia boards, vinyl siding, or standard brick veneer. The pulling forces are immense. You must lock your heavy-duty pad eyes directly into the structural framework of your home—such as the corner studs, roof rafters, or solid concrete foundations. If you are using ground posts, use 6×6 inch pressure-treated timber or schedule 40 steel pipes embedded deep into concrete footings.
2. Account for the Hardware Catenary Factor
Do not buy a sail that matches the exact dimensions of your patio space. You need to leave a tensioning gap of roughly 10% to 15% of the total sail length at each corner. This space accommodates the essential mounting hardware: heavy-duty turnbuckles, D-shackles, and high-tensile wire extensions.
3. Tensioning to the Sweet Spot
Attach your corners and begin tightening the turnbuckles systematically. A properly tensioned sun shade sail should be as taut as a drum skin. When you strike the center of the fabric with your hand, it should feel rigid and exhibit minimal vibration. If the center sags or flaps in a light breeze, the sail is under-tensioned and will degrade rapidly due to friction fatigue.
| Technical Metric | Standard Residential Grade | Commercial Architectural Specification |
| Fabric Density | 150 – 180 GSM | 280 – 340+ GSM |
| Corner Construction | Simple folded webbing | Marine-grade stainless steel D-rings with reinforced layered webbing |
| UV Blockage Rating | 75% – 85% | 93% – 98% |
| Hardware Requirement | Zinc-plated hardware | 316 Marine-Grade Stainless Steel |
💡 Pro Tip: The Perimeter Wire Rope Trick
Look closely at the edges of a premium sun shade sail. Instead of straight, flat lines, the edges are deliberately cut with an inward curve called a catenary curve. When you tighten the corners, that curve pulls the center of the fabric tight. For large installations, choose a sail that has an invisible stainless steel wire rope sewn directly into the hem perimeter. This transfers the tension across the entire body of the fabric, preventing the center from ever sagging over time.
The Structural Danger of Winter Snow and Tree Canopies
Before you leave your brand-new sail up year-round, heed these two hidden warnings that save my clients thousands of dollars in property damage:
-
The Winter Snow Load Trap: While HDPE fabric allows wind to pass through, it will instantly catch heavy, wet winter snow. A couple of inches of snow accumulation on a large sail can easily create over 1,000 pounds of downward weight, snapping your mounting posts or causing structural failure to your home’s roofline. Always take your shade sails down before the first winter freeze.
-
Sap and Tanin Bleeding: Avoid hanging your sail directly underneath sap-producing trees like pines or oaks. The organic tannins and sticky sap will permanently stain the fabric and clog the microscopic pores of the knit, ruining the ventilation properties and turning your beautiful architectural canopy into a dirty, mold-prone eyesore.
Conclusion: Take Back Your Outdoor Oasis
Upgrading your home with an architecturally tensioned sun shade sail is one of the smartest, most cost-effective ways to beat the summer heat and extend your usable living square footage. By mastering the principles of hyperbolic paraboloid geometry, choosing high-density GSM fabrics, and using rigid structural anchors, you can create a beautiful, cool backyard oasis that stands strong against the elements.
Now, I want to hear from you! What does your current backyard or patio layout look like, and what has been your biggest challenge with solar heat or high winds in the past? Drop your thoughts, questions, or current setups in the comments below—let’s design your ideal outdoor space together!