Architectural Privacy Engineering: Enhancing Seclusion with the Outdoor Privacy Slat
Source:https://pergolascentralcoast.com
Imagine you’ve just finished a long week, and you’re finally sitting on your deck with a fresh cup of coffee, ready to enjoy the morning sun. Just as you start to relax, you lock eyes with your neighbor who is taking out the trash exactly ten feet away. The “oasis” you spent thousands building suddenly feels like a fishbowl. In my ten years of re-engineering outdoor spaces, this is the number one complaint I hear: homeowners don’t just want a yard; they want a sanctuary.
Often, the solution isn’t a massive, expensive brick wall that blocks the breeze and makes you feel claustrophobic. Instead, the most elegant fix I’ve ever utilized is the Outdoor Privacy Slat. It is the perfect middle ground between total exposure and total isolation, offering a sophisticated way to engineer seclusion without sacrificing the “outdoor” feel of your property.
The Physics of Sightlines: Why Slats Outperform Solid Walls
In the world of home improvement, we talk a lot about “visual permeability.” A solid fence is like a blackout curtain; it stops light, wind, and sight entirely. While that sounds good in theory, it often creates “micro-climates” of stagnant air and oppressive shadows that can actually kill your lawn and make your patio uncomfortably hot.
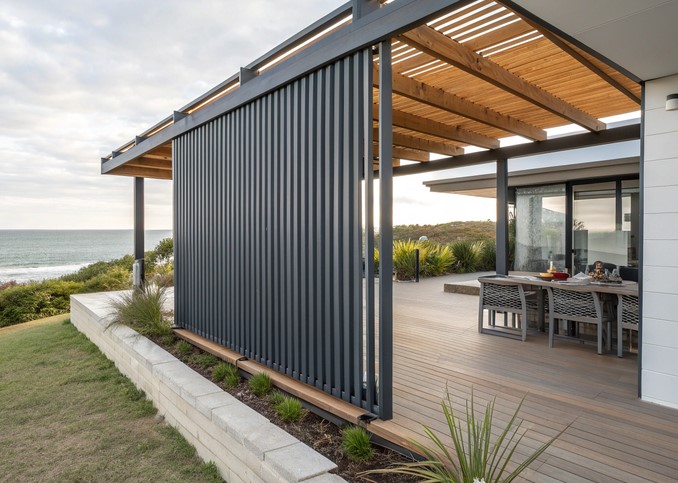
An Outdoor Privacy Slat system works differently. By using precisely spaced horizontal or vertical bars, you are essentially creating a visual filter. From a direct angle, you can see through them slightly, but as the angle of the observer changes (like someone walking down the sidewalk), the slats overlap visually to create a solid barrier.
The Venetian Blind Analogy
Think of these slats like a giant, durable set of Venetian blinds for your yard. By adjusting the spacing and the depth of the slat, you can “tune” your privacy. If you want to block the view of a neighbor’s second-story window but still want to see your flower beds, you angle the slats accordingly. You’re not just building a fence; you’re managing light and sight like an architect.
Materials Science: Choosing the Right Outdoor Privacy Slat
I’ve seen many DIYers make the mistake of choosing aesthetics over durability. When you’re installing an Outdoor Privacy Slat, you have to remember that these thin profiles are under constant stress from UV rays and wind “uplift.” Here is the breakdown of what actually lasts in the field:
-
Pressure-Treated Lumber: The most common choice, but it requires the most maintenance. Because slats are thin, they are prone to warping and twisting as they dry out in the sun.
-
Aluminum Powder-Coated Slats: This is my personal favorite for modern homes. It’s lightweight, never rots, and provides a crisp, industrial look that won’t sag over time.
-
Composite (WPC): A great middle ground. It mimics the look of wood but uses recycled plastics and wood fibers to resist moisture and insects.
-
High-Density Polyethylene (HDPE): Often used as “inserts” for existing chain-link fences. It’s the most budget-friendly way to scale privacy quickly.
The “Wind Load” Factor
One technical detail I always emphasize is the drag coefficient. A solid wall catches wind like a sail, which can rip posts out of the ground during a storm. Because an Outdoor Privacy Slat system has gaps, it allows the wind to “bleed” through, significantly reducing the pressure on your footings and extending the life of the structure.
Engineering the Install: Precision and Spacing
For a beginner or intermediate renovator, the biggest challenge isn’t the heavy lifting—it’s the math. If your spacing is off by even an eighth of an inch, the human eye will pick it up instantly. It turns a professional-grade project into a “DIY disaster.”
Pro Tip: The “Spacer Block” Method
Tips Pro: Never measure each gap with a tape measure. Instead, cut two small “spacer blocks” out of scrap wood to the exact width of your desired gap (usually 0.5 to 1.5 inches). Rest the next Outdoor Privacy Slat on these blocks before screwing it in. This ensures mathematical perfection across the entire span and saves hours of frustration.
Vertical vs. Horizontal: Which Should You Choose?
-
Horizontal Slats: These are trending heavily right now. They tend to make a small yard feel wider and more expansive. However, they require more structural support (shorter spans between posts) to prevent sagging.
-
Vertical Slats: Better for height. If you are trying to block a tall building, vertical lines draw the eye upward and usually stay straighter over long periods because gravity isn’t pulling against the wide face of the board.
The “Ladder” Effect
Here is a safety warning I’ve had to give many parents over the years. When you install horizontal Outdoor Privacy Slat panels, you are essentially building a ladder. If you have small children or pets, ensure the spacing is either too small for a foot to get a grip or that the panels are high enough that they don’t lead to a dangerous drop on the other side.
In some jurisdictions, local building codes actually prohibit horizontal slats on pool fences for this very reason. Always check your local HOA and city ordinances before you buy your materials.
Maintenance and Longevity: Protecting Your Investment
Even the best Outdoor Privacy Slat will fail if the hardware isn’t up to par. In my ten years of experience, the wood usually outlasts the screws if you use the cheap stuff.
-
Use Stainless Steel or Galvanized Fasteners: Standard exterior screws will eventually “bleed” tannins or rust, leaving ugly black streaks down your beautiful slats.
-
Thermal Expansion: Remember that materials like composite and aluminum will grow and shrink with the temperature. If you “pin” them too tightly without allowing for a tiny bit of movement, the slats can buckle or pop the screw heads off.
-
UV Protection: If using wood, apply a high-quality UV-rated stain every 2–3 years. The thinness of a slat means it can dry out and become brittle much faster than a thick 4×4 post.
Scannable Privacy Engineering Checklist
-
Determine Sightlines: Have a friend stand in the “problem area” while you sit in your favorite chair to find the exact height needed.
-
Set the Footings: Ensure your posts are buried at least 1/3 of their total height (and below the frost line) to handle the weight of the slats.
-
Select Your Gap: A 0.5-inch gap provides nearly 90% privacy, while a 1.5-inch gap feels more like a decorative screen.
-
Hardware Check: Ensure you have enough fasteners—horizontal slats typically require two screws per post intersection to prevent “cupping.”
Conclusion: Reclaiming Your Outdoor Freedom
Installing an Outdoor Privacy Slat system is one of the few home improvement projects that provides an immediate emotional ROI. The moment that last slat is leveled and secured, the “vibe” of your yard shifts. It transforms from a public space into a private room without a ceiling.
By focusing on the technical aspects of spacing, material durability, and wind load, you aren’t just putting up a fence—kamu sedang melakukan architectural engineering untuk kenyamanan hidupmu sendiri.
What part of your yard feels the most exposed right now? Are you leaning toward a modern aluminum look or a classic cedar warmth? Drop a comment below and share your project plans—I’d love to help you troubleshoot your spacing or material choices before you start digging!