DIY Garden Waterfalls
Source:https://www.aquascapeconstruction.com
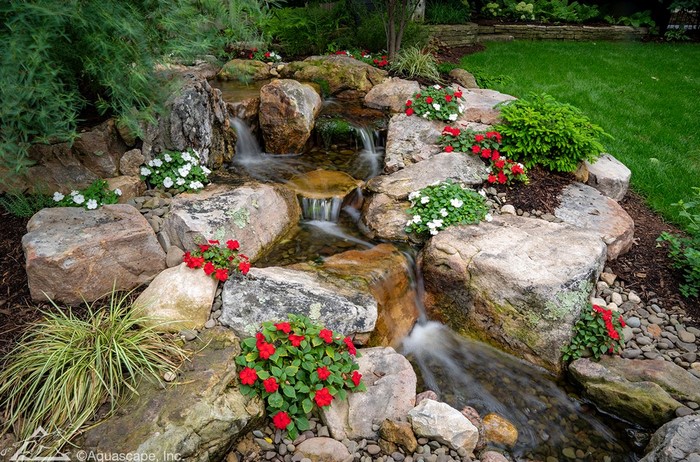
How to Create Stunning DIY Garden Waterfalls
Incorporating the soothing sound of flowing water into your outdoor space can dramatically enhance its ambiance and visual appeal. Waterfalls not only serve as striking focal points but also promote relaxation and attract wildlife such as birds and butterflies. Many homeowners assume that garden waterfalls require complex installation and high costs, but with the right planning and materials, anyone can build one themselves. In this guide, we’ll explore how to create stunning DIY garden waterfalls that bring tranquility, beauty, and a touch of nature to your backyard without breaking the bank.
Why Build a DIY Garden Waterfall?
Water features are more than just decorative elements—they serve functional and psychological purposes as well. A waterfall adds dynamic movement to your landscape, helps filter and aerate pond water if you have one, and masks unwanted noise such as traffic or neighborhood sounds. The therapeutic benefits of water sounds have been shown to reduce stress, making waterfalls a wonderful addition for wellness-focused homeowners.
Building a waterfall yourself also gives you creative freedom. You can customize it to fit your yard’s size, style, and existing features. Whether your taste leans toward modern minimalism or rustic natural settings, a DIY approach allows you to create a design that truly reflects your personality.
Choosing the Right Design and Location
Planning Your Waterfall Project
Before you start digging or stacking rocks, planning is key to ensuring a smooth DIY project. Here are the most important factors to consider:
-
Location: Choose a visible and accessible spot in your yard. Ideally, place the waterfall near your outdoor seating area so you can enjoy the view and sound. It should also be close to a power source for the pump.
-
Size and Scale: Consider the proportions of your garden. A small, tiered waterfall may suit a cozy backyard, while a larger cascading design fits better in expansive landscapes.
-
Water Source: Will your waterfall feed into a pond, or will it recirculate into a hidden reservoir? Pondless waterfalls are great for smaller spaces and are safer for households with children or pets.
-
Material Selection: Natural stones, boulders, and gravel provide a rustic and organic appearance, while concrete, tiles, or metal can create a modern aesthetic. Whichever you choose, make sure the materials are weather-resistant and safe for use around water.
Step-by-Step Guide to Building a DIY Garden Waterfall
1. Gather Your Tools and Materials
You’ll need:
-
A water pump (sized based on waterfall height and flow rate)
-
Flexible or PVC tubing
-
Pond liner or a pre-formed basin (if building a pondless waterfall)
-
Landscape fabric
-
Rocks, stones, gravel, and decorative elements
-
Shovel, level, and garden gloves
2. Excavate and Shape the Waterfall Base
Begin by digging a shallow basin where the water will collect. If you’re building a pondless system, dig deep enough for a water reservoir and pump vault. Use landscape fabric beneath your liner to prevent punctures from sharp rocks or roots.
3. Install the Pump and Tubing
Place the pump at the lowest point of the basin. Run the tubing from the pump to the top of the planned waterfall path, hiding it beneath or behind rocks. Make sure the tubing is long enough and properly secured to prevent leaks.
4. Construct the Waterfall Tiers
Use flat stones or stacked boulders to build each level of your waterfall. Slope each tier slightly forward so water flows naturally downward. Place larger rocks first for stability, then fill gaps with smaller stones and gravel. Create channels or notches to guide water over specific edges for a cascading effect.
5. Test and Adjust Water Flow
Fill the basin with water and plug in the pump. Observe how the water moves across the stones and adjust the placement to improve flow and eliminate splashing. You may need to reposition rocks or adjust tubing pressure for optimal performance.
6. Finish with Landscaping Touches
Once your waterfall is functioning properly, add finishing touches to blend it into your garden. Surround the area with ornamental grasses, flowering plants, or even solar lights. This enhances the natural look and makes the waterfall a centerpiece of your landscape design.
Maintenance and Seasonal Tips
A DIY garden waterfall, while relatively low-maintenance, still requires regular care to ensure its longevity and cleanliness:
-
Clean the pump filter monthly to remove debris and prevent clogging.
-
Check for leaks or liner wear, especially after heavy rain or freezing temperatures.
-
Top off water levels regularly to account for evaporation.
-
Winterize your waterfall by draining the pump and storing it indoors in colder climates.
Taking these steps helps protect your investment and keeps your waterfall running beautifully for years to come.
Conclusion: A Rewarding Backyard Feature
Creating a waterfall may seem ambitious, but with thoughtful planning and a bit of manual work, the results can be extraordinary. You don’t need a large budget or specialized skills to bring the tranquility of nature into your own backyard. By following these steps, you’ll learn how to create stunning DIY garden waterfalls that are both functional and visually inspiring. Whether you’re building your first water feature or adding to a garden oasis, a DIY waterfall is a rewarding project that elevates your outdoor living space while offering endless enjoyment.