Advanced Engineering Metrology: Ensuring Accuracy with the Digital Caliper Tool
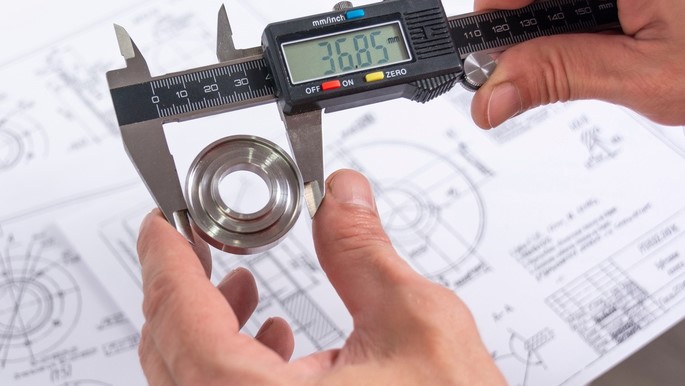
Source:https://cdn11.bigcommerce.com
You are standing in your workshop, working on a custom wood-and-steel shelving unit. You pull out a standard tape measure, eyeball a metal bracket at roughly 3/8 of an inch, lock it down, and drill your pilot holes. Ten minutes later during final assembly, you realize the bolt won’t push through—the diameter is off by a mere 0.5 millimeters, completely ruining a structural steel frame you spent two hours cutting.
Over my ten-plus years navigating residential renovations, custom carpentry, and hardware engineering, I have seen this exact nightmare play out countless times. Homeowners and intermediate makers frequently waste hundreds of dollars on ruined materials because they are trying to measure precision components using tools designed for rough framing.
In my early days as an apprentice, I used to rely entirely on standard tape measures and basic metal rulers. A senior millwright noticed me struggling to match a replacement brass plumbing fitting, laughed, and handed me his personal pocket sensor array.
That single afternoon transformed my entire approach to trade accuracy. Stepping up your home improvement game from “close enough” to absolute precision requires introducing a dedicated digital caliper tool into your layout arsenal.
The Language of Metrology: Why Fractions Fail in Precision Spaces
When you are framing a backyard deck, being off by 1/16 of an inch rarely matters. But when you are matching internal pipe threads, duplicating furniture dowels, or measuring the internal diameter of a worn-out mechanical bearing, fractional guesswork is an absolute death sentence for your project.
Think of using a standard tape measure for high-precision building components like trying to perform delicate eye surgery while wearing thick, padded winter mittens. You can see the general target area, but you completely lack the fine resolution needed to interact with it successfully.
[Tape Measure Inspection] -> Fractional Guesswork -> Loose Joints & Hardware Friction
[Digital Caliper Scan]    -> Metric/Imperial Precision -> Perfect Mechanical Clearance
A professional digital caliper tool bridges this resolution gap entirely. It translates physical dimensions into an incredibly precise digital readout, capturing variances as small as 0.01 millimeters or 0.0005 inches. This structural metric ensures that every piece of custom hardware you design fits flawlessly on the very first try.
Technical Specifications: The Anatomy of a High-Performance Caliper
Before you buy a cheap plastic model from a discount bin, you need to understand the underlying engineering and material science that drives these metrology instruments. A precision tool requires structural integrity to guarantee operational repeatability.
1. The Four-Way Measurement Framework
A pro-grade digital caliper tool isn’t just for measuring the thickness of a board. It features four distinct, precision-ground measuring surfaces engineered to track specific metrics:
-
External Jaws: Flat, hardened steel faces used to capture the outside diameter or thickness of an object.
-
Internal Jaws: Knife-edged top teeth designed to slip inside tubes, pipes, or holes to map internal diameter.
-
Depth Rod: A thin metal bar that extends out from the tail of the main beam to measure the absolute depth of slots or blind holes.
-
Step Measuring Faces: The back edge of the moving jaw, engineered to measure the distance between two parallel steps on a workpiece.
2. Material Composition: Hardened Stainless Steel vs. Carbon Fiber
For true workshop longevity, avoid carbon fiber or plastic frames entirely. They flex under moderate thumb pressure, altering your readings by several thousandths of an inch. Insist on a frame machined entirely from hardened stainless steel, featuring a smooth, lapped slider surface for frictionless movement.
3. Capacitive vs. Inductive Linear Encoders
Modern calipers track movement using an internal electronic scale underneath the main sticker. Advanced units feature an IP67-rated inductive encoder. This means the sensor is completely immune to dust, flying wood chips, coolant, and oil splashes—crucial if you are operating a dirty drill press or lathe.
Step-by-Step Execution: Calibration and Operational Best Practices
Using a digital metrology tool is incredibly simple, yet doing it incorrectly will quickly introduce user bias into your data. Follow this field protocol to guarantee absolute measurement accuracy every time you pull the tool out of its case.
Step 1: The Clean Zero Protocol
Before turning the unit on, take a clean microfiber cloth and thoroughly wipe down the external jaw faces. Close the jaws completely using gentle pressure. Look closely at the LCD screen; if it reads anything other than a flat 0.00, press the Zero button to reset the electronic datum line.
Step 2: Mind the Thumb Roller Tension
Never violently clamp the jaws onto your workpiece. Excessive force will flex the stainless steel frame and give you a falsely low reading. Instead, use the integrated thumb roller to smoothly advance the jaw until it lightly makes contact with the material, then read the display.
Step 3: Enforce Parallel Alignment
When measuring cylindrical items like copper plumbing pipes, ensure the jaws sit perfectly perpendicular to the long axis of the pipe. If the caliper is tilted even slightly sideways, you will register an angled profile, artificially inflating your outer diameter data.
💡 Pro Tip: The Differential Measurement Hack
Imagine you need to source a replacement bolt to fit inside a recessed hole, but you also need to account for a washer. You don’t need to do complex mental math. Simply slide your digital caliper tool inside the recessed hole, hit the Zero button while the jaws are open, and then measure your bolt thickness. The screen will automatically display the exact mathematical difference, showing you precisely how much clearance you have left!
The Battery Parasite Blindspot
Here is a technical warning that catches intermediate home improvement enthusiasts completely off-guard: cheap digital calipers never truly turn off.
When you press the power button on a budget-tier caliper, it merely shuts down the LCD glass screen while the internal capacitive sensor continues tracking the slider location 24/7. If you leave the tool sitting in your toolbox for six months, you will open the case to find a completely dead LR44 alkaline battery right when you need it most.
To eliminate this operational headache, always pull the battery out before long-term storage, or specifically purchase a tool featuring an Automatic Shut-Off with Absolute Encoder technology, which preserves battery life for up to three years of continuous field use.
Achieving Zero-Tolerance Perfection
At the end of the day, elevating your home improvement skills is about moving away from sloppy visual estimates and embracing industrial precision. Integrating a high-caliber digital caliper tool into your building pipeline ensures that your woodwork joints align perfectly, your mechanical fasteners lock down securely, and your custom fabrications function seamlessly. It is the ultimate diagnostic weapon for anyone ready to stop guessing and start building with absolute confidence.
Are you ready to bring precision manufacturing standards into your home workshop this weekend? What specific project have you been working on lately that requires absolute mathematical accuracy? Let me know in the comments below, and let’s talk shop!