Protecting Critical Ventilation: Long-Term Maintenance of the Roof Chimney Cap
Source:https://portlandfireplaceandchimney.com
You’re sitting by a cozy fire on a rainy Tuesday night when you hear a faint thud-scratch-thud coming from inside the walls of your chimney. Or worse, you notice a dark, damp stain spreading across the ceiling near your hearth. Most homeowners assume their chimney is a solid, indestructible pillar of brick, but without a functional roof chimney cap, your home is essentially wearing a “Please Flood Me” sign directed at the sky.
In my ten years of climbing onto rooftops and inspecting flue liners, I’ve pulled everything from soggy squirrel nests to rotted mortar out of unprotected chimneys. It’s a classic case of a $100 part preventing a $10,000 masonry rebuild. We often focus on the “pretty” parts of home improvement—the new cabinets or the fresh paint—but the roof chimney cap is the unsung hero of your home’s structural integrity. It is the tactical umbrella that keeps your ventilation system from becoming a vertical swimming pool.
Why the Roof Chimney Cap Is Your Home’s First Line of Defense
Think of your chimney as a giant straw sticking out of your house. Without a cap, that straw is open to rain, snow, debris, and curious wildlife. In the industry, we often see “passive destruction”—the kind of damage that happens so slowly you don’t notice it until it’s a catastrophe.
Water is the ultimate enemy of masonry. When rain enters an uncapped flue, it soaks into the mortar joints and the firebrick. During winter, this water freezes and expands—a process we call freeze-thaw spalling. This can literally turn your chimney’s interior into a pile of gravel over time. A high-quality roof chimney cap stops this cycle before it even starts.
The Wildlife Factor
I once visited a home where the family complained of a “foul smell” every time they used the furnace. It turned out a family of raccoons had mistaken their warm flue for a penthouse suite. Besides the smell, animal nesting materials are highly flammable and can lead to devastating chimney fires. The mesh screen on a professional cap acts as a “bouncer,” keeping the pests out while letting the smoke escape.
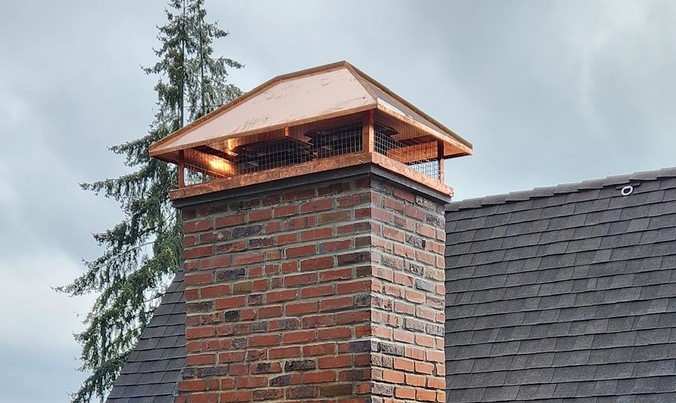
Technical Anatomy: Choosing the Right Shield
Not all caps are created equal. When you’re browsing the aisles of a hardware store or talking to a contractor, you need to look past the shine and focus on the material density and ventilation capacity.
Stainless Steel vs. Copper vs. Galvanized
-
Galvanized Steel: The budget option. It works, but in my experience, it usually starts to rust within 3 to 5 years. I rarely recommend these for long-term homeowners.
-
Stainless Steel: The “Goldilocks” choice. It’s incredibly durable, won’t rust, and usually comes with a lifetime warranty. It’s the industrial standard for a reason.
-
Copper: The aesthetic powerhouse. It develops a beautiful green patina over time. It’s expensive, but if you’re looking for “Aesthetic Engineering,” this is the one.
Single-Flue vs. Multi-Flue Caps
If you have one pipe sticking out, a single-flue cap that clamps directly onto the clay tile is sufficient. However, if you have a massive brick structure with multiple pipes (flues), you should opt for a top-mount multi-flue cap. These cover the entire “chimney crown” (the concrete top), protecting the most vulnerable part of the brickwork from cracking.
Long-Term Maintenance: The Expert’s Inspection Routine
Installing a roof chimney cap isn’t a “set it and forget it” task. To ensure “Critical Safety Infrastructure,” you need to perform an annual checkup. The analogy I use is the “Gutter Rule”: if you need to clean your gutters, you need to check your cap.
Checking the Spark Arrestor
The mesh on your cap is technically a spark arrestor. Its job is to catch burning embers before they land on your cedar shingle roof. However, this mesh can become clogged with “creosote”—a thick, tar-like byproduct of burning wood.
-
The Danger: A clogged mesh restricts the “draft,” which can push deadly Carbon Monoxide back into your living room.
-
The Fix: Use a stiff wire brush to clear any soot or bird droppings from the mesh every autumn before your first fire.
Inspecting the Attachment Points
High winds and thermal expansion can loosen the screws or clamps holding your cap in place. I’ve seen caps blown three yards away during a storm because the homeowner didn’t check the tension for five years. Ensure the masonry screws are tight and the silicone sealant around the base hasn’t peeled away.
Expert Advice: The “Spark-Out” Warning
If you notice black streaks running down the outside of your chimney, your cap might be too small or improperly vented. This is often a sign of poor combustion. A professional-grade roof chimney cap should have enough “free area” to ensure the smoke doesn’t cool down and condense before it leaves the cap.
Common Pitfalls: The Beginner’s Mistake
The biggest mistake I see beginners make is buying a “one size fits all” cap. Chimney flues come in various shapes—square, rectangular, and round. If the cap doesn’t sit flush, it creates a gap.
Analogy Time: Using the wrong sized cap is like wearing a hat that’s two sizes too big in a windstorm. It might look like it’s covering your head, but it’s going to fly off the moment things get rough, and it won’t keep your ears warm in the meantime.
Always measure the outside dimensions of your flue tile, not the inside. If the tile is flush with the chimney top, you’ll need a “leg-mount” kit or a top-mount model that screws into the concrete crown.
The ROI of Prevention
From a technical perspective, a chimney rebuild can cost between $3,000 and $15,000 depending on the height and material. A premium stainless steel roof chimney cap costs a fraction of that. By keeping the interior of the flue dry, you are essentially extending the life of your entire heating system.
When I perform home inspections for buyers, the first thing I look at is the chimney. A well-maintained cap tells me the owner cared about the “bones” of the house. It’s a silent signal of quality and attention to detail.
Maintenance Checklist for Your Roof Chimney Cap
-
Spring: Check for animal nesting or winter storm damage.
-
Autumn: Brush away soot and creosote buildup from the spark arrestor.
-
Every 3 Years: Re-apply a water-repellent masonry sealer to the chimney crown beneath the cap.
-
Hardware Check: Ensure screws are not stripped and the mounting brackets are firm.
Conclusion: Protect Your Hearth
Your chimney is more than just a decorative feature; it is a critical ventilation lung for your home. Neglecting the roof chimney cap is like leaving your front door open during a hurricane. By taking the time to select the right materials and committing to a simple annual maintenance routine, you’re ensuring that your home remains safe, dry, and efficient for decades to come.
Home improvement isn’t always about the flashy upgrades. Sometimes, the most important work happens 30 feet in the air, hidden from view, under the protective shield of a well-engineered cap.
Have you checked the top of your chimney lately? Are you worried about strange noises or moisture near your fireplace? Share your chimney stories or ask a technical question in the comments below—I’m here to help you keep the rain out and the heat in!